

错误代码: 13.B9.Dz | ●13.B9.D1 | ●13.B9.D2 | ●13.B9.D3 | ●13.B9.D4 |●13.B9.DD | 惠普5系激光打印机 故障代码 其他系列也可以参考 | 二〇二一年五月二十七日
2025-10-30
错误代码: 13.B9.Dz | ●13.B9.D1 | ●13.B9.D2 | ●13.B9.D3
| ●13.B9.D4 |●13.B9.DD | 惠普5系激光打印机 故障代码 其他系列也可以参考 | 二〇二一年五月二十七日
--------------------------------------------------
技术热线:朱师傅整理
--------------------------------------------------
中文译本:
13.B9.Dz
描述
定影器送纸延迟卡纸
介质未达到指定时间的热熔器传感器SR9。
●13.B9.D1
从纸盘1打印时,定影器送纸延迟卡纸。
●13.B9.D2
从纸盘2打印时,定影器传送延迟卡纸。
●13.B9.D3
从纸盘3打印时,定影器送纸延迟卡纸。
●13.B9.D4
从纸盘4打印时,定影器送纸延迟卡纸。
●13.B9.DD
使用双面打印器打印时,定影器传送延迟卡纸。
ZHCN故障排除工具231
从www.Manualslib.com手册搜索引擎下载推荐的操作
以下是可能的原因和应调查的领域。
●发现卡纸缠绕在定影辊上。在这种情况下,这是定影器已损坏的迹象。
●在墨粉盒下方或转印区域中发现卡纸。在这种情况下,可能是
硒鼓驱动器或将墨粉盒固定在位的白色项圈损坏。
●定影器驱动器或交付问题。
1.确定卡纸位于何处。
2.打开右上门,然后检查墨粉盒下方。
3.卸下定影器并检查是否有介质或阻塞物。
定影之前介质已停止
1.彻底检查双面打印纸通道和ITB /转印区域是否有辊,卡纸问题。
或可能导致卡纸的任何潜在障碍物
2.确认转印辊安装正确,并且没有磨损或变形。如有必要,将其更换。
3.检查传输进纸组件是否有碎屑或损坏。更换右门子总成。
介质停在定影器中或定影器处
注意:热凝器可能是热的。
1.卸下定影器并检查定影器套筒,压力辊和出纸辊是否阻塞和/或
损害。根据需要更换定影器。
2.确认热凝器入口导板没有分离或损坏。
3.打开以下菜单:
●行政
●故障排除
●诊断测试
4.使用手动传感器测试来测试定影器传送传感器(SR9),以验证传感器是否正常运行
正确地。如果不是,请更换定影器。
5.轻触组件测试。
6.运行定影器电机驱动器测试,以验证定影器驱动器和齿轮是否正常运行。如果他们
否则,请更换定影器电机组件。
如果介质未停止在“定影器中”或“墨粉/转印区域”。
1.检查转印区域和定影器之间的纸张通道。
2.检查转印辊和定影器之间纸张通道中的小皮带是否损坏或
运动问题。如有必要,请更换。
232第2章解决问题ZHCN
从www.Manualslib.com手册搜索引擎下载3。检查皮带是否磨损,脏污或损坏。
4.如果介质已在该区域停止,并且不会超出进纸导轨组件的“清洁”,“维修”或“
更换进纸导轨组件。
--------------------------------------------------
英文解释:
13.B9.Dz
Description
Fuser delivery delay jam
Media did not reach Fuser sensor SR9 specified time.
● 13.B9.D1
Fuser delivery delay jam when printing from Tray 1.
● 13.B9.D2
Fuser delivery delay jam when printing from Tray 2.
● 13.B9.D3
Fuser delivery delay jam when printing from Tray 3.
● 13.B9.D4
Fuser delivery delay jam when printing from Tray 4.
● 13.B9.DD
Fuser delivery delay jam when printing with the Duplexer.
ENWW Tools for troubleshooting 231
Downloaded from www.Manualslib.com manuals search engine
Recommended action
The following are possible causes and areas that should be investigated.
● The paper jam is found wrapped around the fuser roller. In this case it is a sign of a worn out fuser.
● The paper jam is found underneath the toner cartridge or in the transfer area. In this case it could be the
drum drive or the white collar that holds the toner cartridge in position has broken.
● Fuser drive or delivery issue.
1. Determine where the Jam is located.
2. Open upper right door and check under the toner cartridge.
3. Remove the fuser and check for media or obstructions.
Media Stopped before Fuser
1. Thoroughly check the duplex paper path and the ITB/Transfer area for issues with rollers, jammed paper
or any potential obstructions that might be causing the jam
2. Verify that the transfer roller is seated properly and not worn or deformed. Replaced it if necessary.
3. Inspect the Transfer feed assembly for debris or damage. Replace Right door sub Assembly.
Media Stopped In or At the Fuser
CAUTION: The fuser might be HOT.
1. Remove the Fuser and inspect Fuser sleeve, Pressure roller and delivery roller for blockage and/or
damage. Replace Fuser as needed.
2. Verify that fuser inlet guide is not detached or broken
3. Open the following menus:
● Administration
● Troubleshooting
● Diagnostic Tests
4. Test the Fuser Delivery sensor (SR9) using the manual sensor test to verify the sensor is functioning
correctly. If it is not, replace the fuser.
5. Touch Component Test.
6. Run the Fuser motor drive test to verify that the Fuser Drive and Gears are functioning correctly. If they
are not, replace the Fuser Motor Assembly.
If media Did not Stop "IN FUSER" or at "Toner/Transfer Area.
1. Check paper path between transfer area and the fuser.
2. Inspect the small belts in the paper path between the Transfer Roller and the fuser for damage or
movement issues. Replace if necessary.
232 Chapter 2 Solve problems ENWW
Downloaded from www.Manualslib.com manuals search engine
3. Check if Belts are worn, dirty or damaged.
4. If media has stopped in this area and will not progress beyond feed-guide assembly CLEAN, Repair or
Replace the feed-guide assembly.
--------------------------------------------------
实际故障案例
5】
故障案例:你好 我有个惠普830也是报这个错误13.b9.dd | 山东临沂Pu_wei_ban_gong888 | 二〇二五年九月二十三日
换定影也不行
验证结果: 不卡了 是硒鼓上那个鼓芯盖子造成的到那块就不顺畅,,,新纸就不卡 ,就是惠普这机器还是挑纸 稍微潮一点就经常卡
-----------------------------------------------------------------
4】
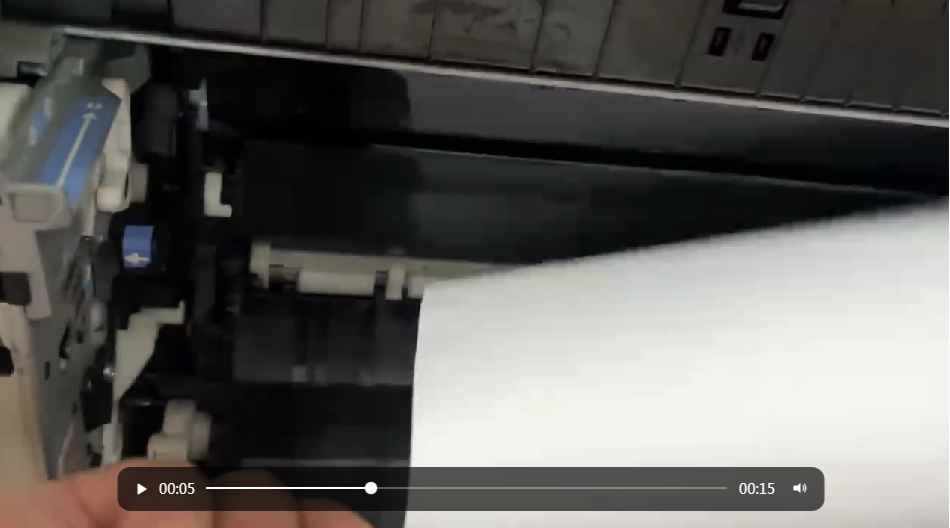
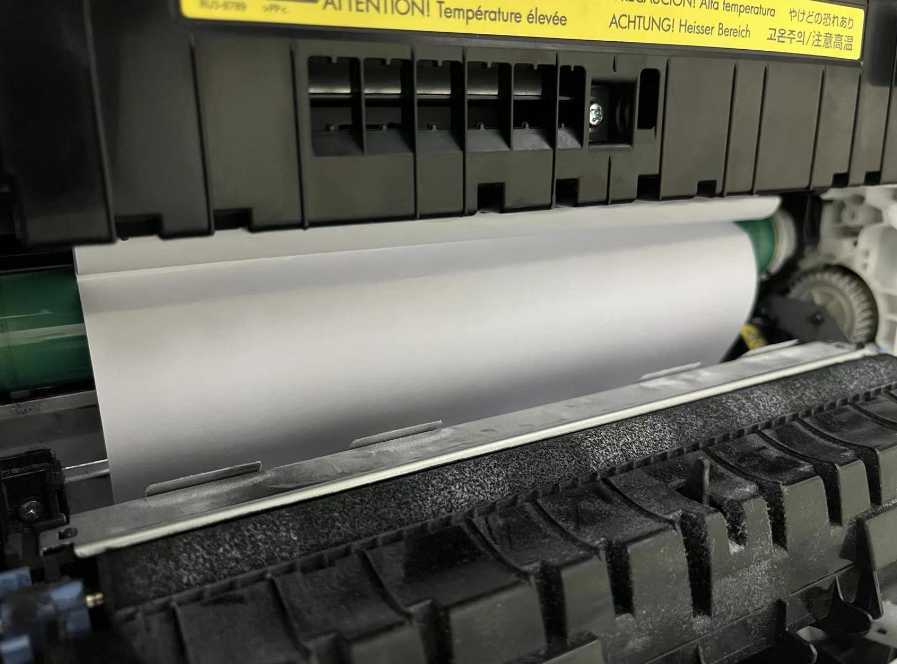
故障案例:惠普m775打印机报错无13.b9.dd热凝器区域卡纸 手送进纸双面打印不卡 下面纸盒进纸打印双面卡纸 打印单面不卡 | 浙江杭州郑经理Zfc18358185773 | 二〇二四年六月三日
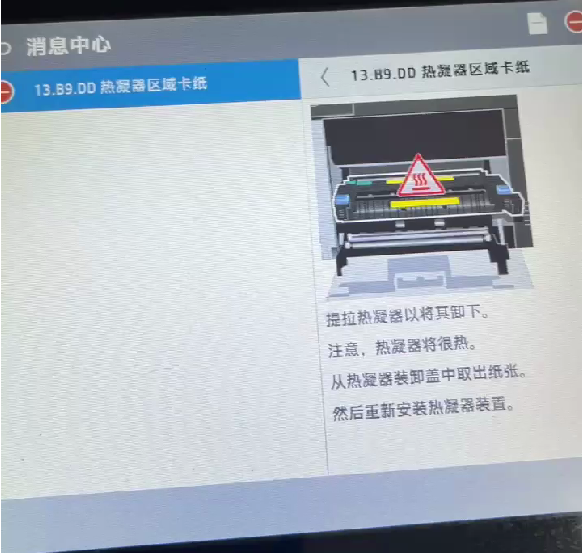
13.B9.DD 热凝器区域卡纸
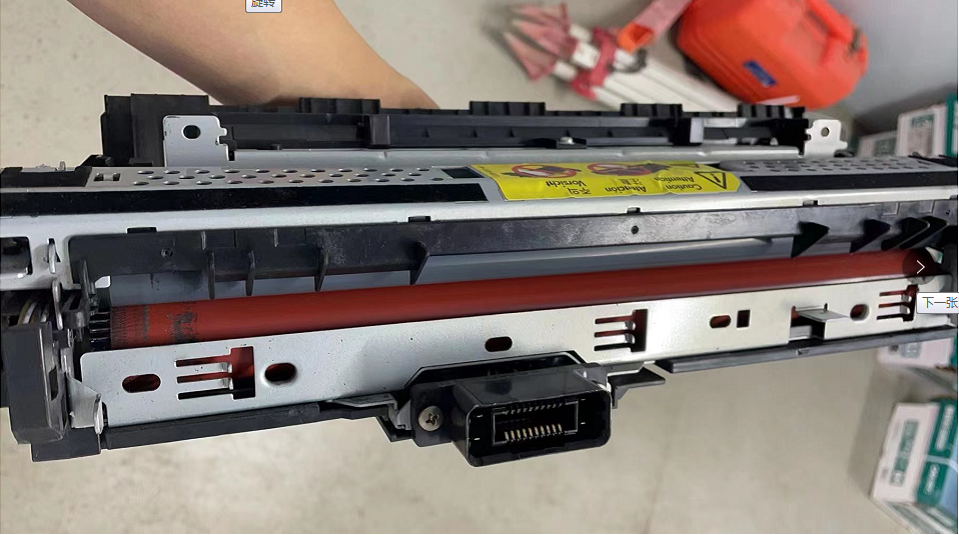
提拉热凝器以将其卸下。
注意,热凝器将很热。
从热凝器装卸盖中取出纸张。
提拉热凝器以将其卸下。
注意,热凝器将很热。
从热凝器装卸盖中取出纸张。
然后重新安装热凝器装置。
Zfc郑经理
我刚刚从侧面打印是OK的
打印20张双面都是正常的
就是下面纸盒的双面会卡
就是下面纸盒的双面会卡
查查手册 看看 进纸路径有什么不同
等待反馈结果:
------------------------------------------------------
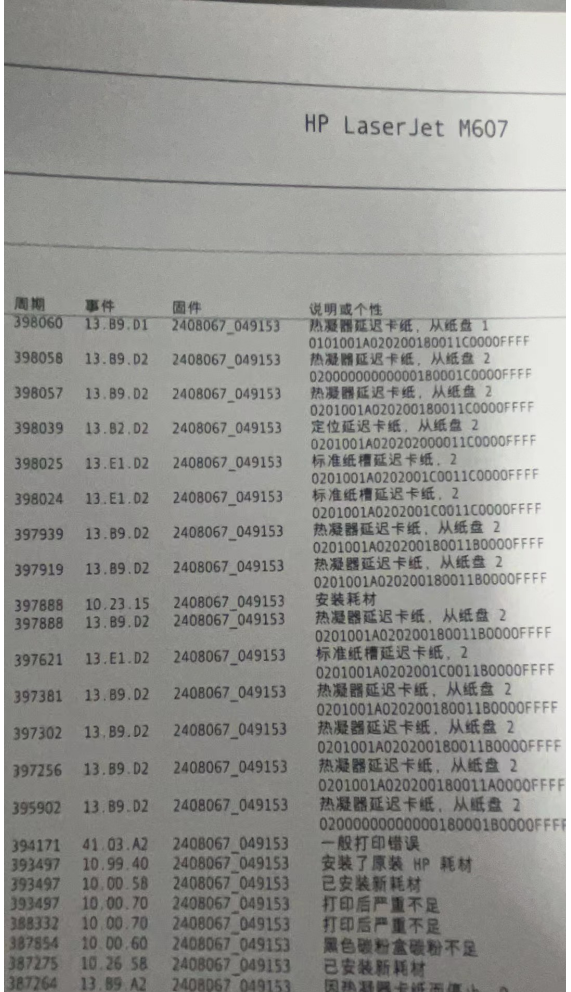
3】故障案例:惠普m607打印机报错 13.B9.D2
还有卡纸折叠 在定影下 | 广东佛山cqtnydz | 二〇二四年五月十五日
分析:
1、纸路阻挡
检查有没异物阻挡 检查转印区域和定影器之间的纸张通道。
2、定影转动异常
检查转印辊和定影器之间纸张通道中的小皮带是否损坏或运动问题
3、换定影组件
等待反馈结果:

--------------------------------------------------
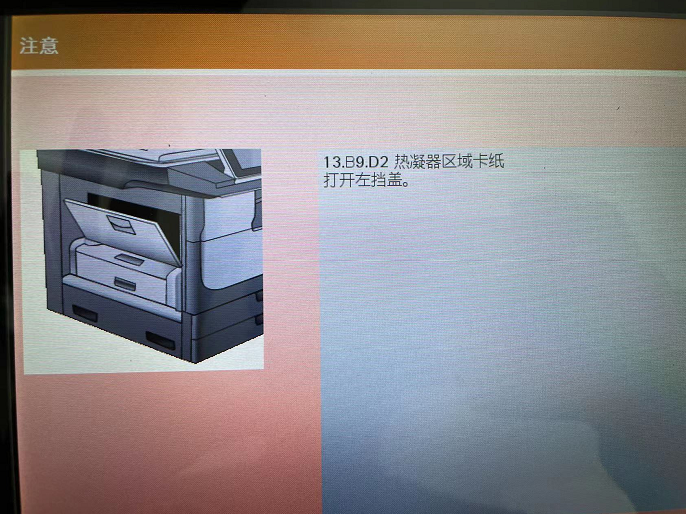
2】故障案例:惠普 m725打印机
报错13.B9.D2热凝器区域卡纸 打开左挡盖。 | 广东湛江一帆jie870734788 | 二〇二二年十月五日
●故障排除
●诊断测试
4.使用手动传感器测试来测试定影器传送传感器(SR9),以验证传感器是否正常运行
正确地。如果不是,请更换定影器。
5.轻触组件测试。
6.运行定影器电机驱动器测试,以验证定影器驱动器和齿轮是否正常运行。如果他们
否则,请更换定影器电机组件。
如果介质未停止在“定影器中”或“墨粉/转印区域”。
1.检查转印区域和定影器之间的纸张通道。
2.检查转印辊和定影器之间纸张通道中的小皮带是否损坏或
运动问题。如有必要,请更换。
●诊断测试
4.使用手动传感器测试来测试定影器传送传感器(SR9),以验证传感器是否正常运行
正确地。如果不是,请更换定影器。
5.轻触组件测试。
6.运行定影器电机驱动器测试,以验证定影器驱动器和齿轮是否正常运行。如果他们
否则,请更换定影器电机组件。
如果介质未停止在“定影器中”或“墨粉/转印区域”。
1.检查转印区域和定影器之间的纸张通道。
2.检查转印辊和定影器之间纸张通道中的小皮带是否损坏或
运动问题。如有必要,请更换。
等待反馈结果:
--------------------------------------------------
1】故障案例:
故障案例:惠普hp LaserJet Enterprise MFP M725 7报错 | 刘经理 wxid_nuqch7isrjne21 |
二〇二二年七月三十日
消中心
13.B9.DD热凝器区
〈13.B9.DD热凝器区域卡纸
A
建议清洁滚筒
纸盘3已空:普通细
13.B9.DD热凝器区域卡纸
打开左挡盖。
13.B9.DD热凝器区
〈13.B9.DD热凝器区域卡纸
A
建议清洁滚筒
纸盘3已空:普通细
13.B9.DD热凝器区域卡纸
打开左挡盖。
分析:
1、真的卡纸了
2、其实没有卡纸 就是定影传感器失灵
等待反馈结果 :


扫描开通重新登录查看更多

添加朱师傅微信咨询